As I wasn't here for this session, I had to pick everything up as we were shooting our preliminary task. Most of it was fairly straightforward for anyone that has ever used an electronic device before: On switch, battery remaining indicator, things like that. Next was the time code, which is in the corner of the screen and is broken down into 4 number readings.
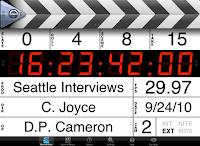 From left to right they are: HH:MM:SS:FF, the last being frames per second. Usually on the cameras we use, there are 25 fps.
Next I was shown how to use the zoom and focus, and was instructed to zoom all the way in and then out again, to make sure the subject is in focus.
From left to right they are: HH:MM:SS:FF, the last being frames per second. Usually on the cameras we use, there are 25 fps.
Next I was shown how to use the zoom and focus, and was instructed to zoom all the way in and then out again, to make sure the subject is in focus.
Next I got a quick briefing on exposure, shutter speed and colour temperature, which wasn't too difficult as it is the same as in photography. Exposure is shown in F stops, ranging from 1 to 22, which measure the amount of light in the shot. By raising the shutter speed, you increase the clarity of the shot and by lowering it, you can blur it. With colour temperature, you first need to set the white balance, by focusing on a white flat surface in the general location of your shoot.
Last week we began discussing ideas for our thriller opening scenes, but as half of my group were away on a business trip, we only had input from the 2 of us that day. However we did get some good ideas floating around, some of which were
- Possesed child,
- Mysterious deaths in boarding house
- Terrorist siege/attack
- Ghostly CCTV images in police station
We also had a few more imaginative ideas, but we passed those off because they were either too complicated or too long.
Storyboarding is the visual idea of what a movie will look like, and is basically a comic book of the film before it is put into production. To the left is an example of a storyboard in its early stages. A detailed storyboard is essential for any film, as it means that shooting can go ahead if there is a last minute change of crew, or if something goes wrong on the day.
A good storyboard provides the director with an outline of what needs to be shot, as although he may have an idea of what he wants to shoot, he won't have thought of every single shot that is required. Storyboards are there as a sort of guideline, and often on the shoot day, directors will change elements in the shoot or alter the shot order if, on camera things don't look quite right.
Film Language
- Mise-en-scene - Everything in the shot that tells the audience something about the scene.
- Sound - The music or effects that trigger responses from the audience. Most effective when loud noise is used, to make people jump.
- Lighting - Creates atmosphere If all is dark with pools of light this can create tension or a sense of unease, wheras if everything is bright then the atmosphere is more relaxed.
- Editing - Takes place when the filming has ceased, the editor takes the best shots and puts them in sequence, whilst adding effects and such if needed.
Different kinds of cuts
- Matched cut - A cut in which a familiar relationship between shots make the change seem 'smooth'.
- Jump cut - An abrupt switch from one scene to another, used to make a dramatic point.
- Motivated cut - A cut used to show the viewer something not immediately visible. Often used for changes of speaker.
- Cross cut - A cut from one narrative or line of action to another.
- Cutaway - A 'bridging' shot between two shots of the same subject, often used to soften uncomfortable jumps in time or space.
- Match on action - A cut in which two parallel actions are mirrored in order to suggest a strong relationship between two scenes.
- Reaction shot - Any shot in which a participant reacts to events.
Miscellaneous Vocab
- Fade - A transition to or from a blank screen.
- Dissolve - A slow transition as one image merges into another.
- Wipe - An optical effect in which one shot 'wipes' another off the screen for dramatic effect.
- Superimposition - Two or more images placed directly on top of each other.
- Split screen - division of screen in order to show two or more lines of action simultaneously.
Above is the mood board that I created 2 weeks ago, showing the elements of horror and thriller movies that scare me or make me uncomfortable. I found it difficult to find pictures of things that scare me as many of these are fears as opposed to things. For example I get terrified when I have open space all around me, such as when I am scuba diving and you temporarily lose orientation. Because of this fear, films such as The Abyss (1989) directed by James Cameron really freak me out when the main character has to dive down a seemingly bottomless trench with limited oxygen, blackness all around him, and millions of tons of water pressing down on him.
My other major fear is of plane crashes, because I have this recurring nightmare about being in a plane crash and I was almost in one in 2007. Below is the link for a plane crash scene from Alive (1993), which makes me break out in a cold sweat when I see it as I was flying in Tibet when our plane lost all power in the engines.
On Tuesday the 12th of October, we began editing our preliminary task in the media suite, working on the Mac Pros and using Final Cut Pro as our software.
The first thing we did was to save all of our files into a rush bin, which gets its name from the early days of film-making, when the lengths of film were stored in hanging bins. Once everything was in the rush bins, we trawled through all of our shots and chose the best ones that we would use, i.e. anything without laughing, swearing or other such mistakes. These shots were then put into the log bin, where we would copy them into the final clip. In this first session we managed to get my dramatic entrance into the room with the first exchange of dialogue. I was happy with this as I think we made more progress than the other groups. Below is a screenshot of the Final Cut Pro 7 software.
In my group for the shoot were Nina, Sophia, Courtney along with myself, and this group will remain the same for our thriller shoots later in the year.
For our preliminary task, we had to shoot a short conversation/argument between 2 people. As we had impressed Matt with our practice shoot a few days earlier, we were allowed to shoot in the studio, which allowed us to get low key lighting, creating a spooky effect. Because we had practiced different ways of shooting the scene, we knew pretty much the order in which we would shoot our various angles.
First we began with 2 complete run-throughs in wide, then progressed to over the shoulder on both myself and Sophia. After that we proceeded to do the close-ups of us both and tried not to laugh as we did it. The close-ups in particular required 5 or 6 attempts because in one of them I stood in front of the camera, and i others we either laughed at each other or moved outside the shot.
Once these essential shots were done, we had a go at putting some extra shots in such as an extreme close up of a phone, and the wide shot of me slamming the door open.
On a whole, I think we did quite well on this task, and when we began editing, it looked darker on the computer, giving that ominous look.
Here is the finished clip
 From left to right they are: HH:MM:SS:FF, the last being frames per second. Usually on the cameras we use, there are 25 fps.


